Map each step
A mapping has five mapping steps and a review step. The step bar at the top of the mapping shows all six steps. Click a step to open it, or use the Next: button at the bottom of the page.
| Step | What you map | Target column |
|---|---|---|
| Structures | Source folders → target folders | Target path |
| Content Types | Source content types → target content types | Target content type |
| Metadata | Source fields → target fields, with rules | Target field |
| Principals | Source users and groups → target users and groups | Target principal |
| Permissions | Source permissions → target permission levels | Target permission level |
| Review | Check what is still open, then export |
Each step card in the step bar shows how many rows are mapped, for example 12/40, and what is left: 12 to go, ✓ Complete or No rows.

Map Content Types before Metadata. The Metadata step only offers the target fields of the target content type you chose for each source content type.
How a step works
Every mapping step has the same layout.
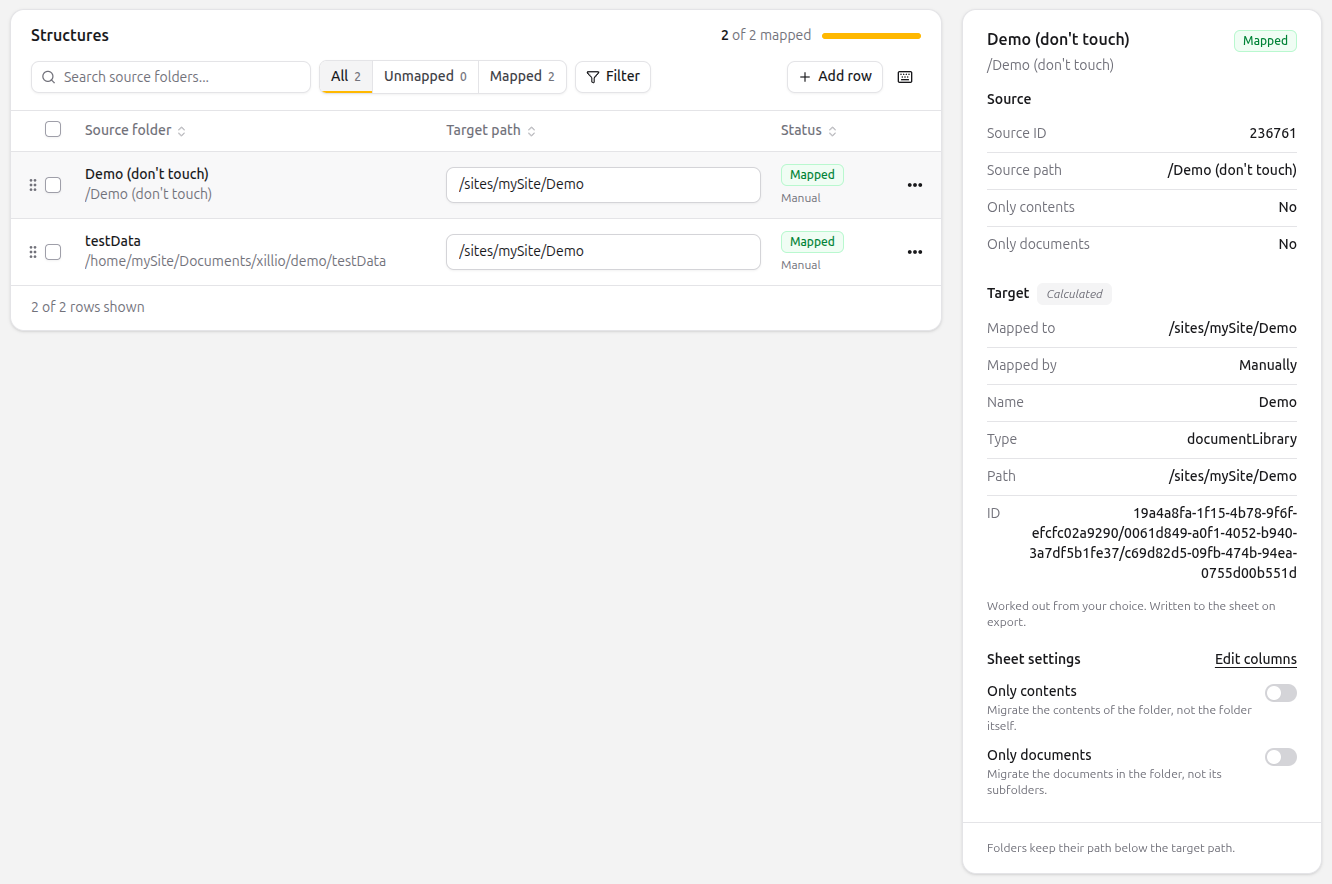
| Part | What it does |
|---|---|
| Guide | The banner at the top tells you what to do next. It points to rows that need a fix (Show row), to rows without a target (Show unmapped), or to the next step when everything is mapped. |
| Table | One row per source item, with a dropdown in the target column. |
| Details panel | The details of the row you clicked: the source details, the checks for the row, the calculated target details and the settings. |
| Sheet view | Folded away below the table. Shows the step as it will be exported, and the target data the dropdowns read from. |
Pick a target
In the target column of a row, open the dropdown and choose a target. The dropdown offers:
- Choose target…: no target yet. The row counts as unmapped.
- The target values of this step.
- No op (do not migrate): the row is deliberately left out of the migration. It counts as done.
- + Add a target value…: the value you need isn't in the target data yet. See Add a target value.
When a row has a target, the details panel shows the target details that the Mapping Tool works out from your choice, marked Calculated. They're written to the Mapping Sheet on export.
Next to the target, a row shows who mapped it: Manual when you picked the target, Imported when the target came with the data, for example from an earlier export.
Settings
Some steps have settings per row, such as Only contents on Structures or Rule on Metadata. Settings belong to the target you map to, so you can only fill them in once the row has a target. You find them in the details panel, and as green columns in the sheet view.
Find rows
Above the table:
- Search: filters the rows by name.
- All, Unmapped, Mapped: filters the rows by status. The counts show how many rows are in each.
- Filter: filters by Target, by Tag (such as the kind or the rule of a row), and by Mapped by: Anyone, Manually or Imported with the data.
- Reset: clears the search, the filters and the sort.
Click a column header to sort. Click it again to reverse the sort, and a third time to clear it.
Work on several rows
Select rows with the checkboxes. A toolbar appears with what you can do with the selected rows:
| Action | What it does |
|---|---|
| Copy | Copies the targets of the selected rows. |
| Paste | Pastes copied targets onto the selected rows. |
| Map selected to… | Gives all selected rows the same target. Only targets that fit every selected row are offered. |
| No op | Sets all selected rows to No op. |
| Delete | Deletes the selected rows, after you confirm. |
The keyboard shortcuts work in the table. Click the keyboard icon above the table to see them.
| Shortcut | Action |
|---|---|
| Shift + click | Select a range |
| Ctrl + A | Select all shown rows |
| Ctrl + C | Copy targets |
| Ctrl + V | Paste targets |
| Del | Delete the selected rows |
| Esc | Clear the selection |
Copied targets paste into Excel too, and cells copied from Excel paste into the table. The row menu (⋯) has the same actions for a single row: Copy target, Paste, Set to No op and Delete row.
Add a row
Use Add row for source items that aren't in the imported data. Fill in the fields of the step, and optionally pick the target right away, or choose Choose later. The row is saved to the mapping right away, and is marked as added.
Add a target value
Choose + Add a target value… in the dropdown of a row, or click Add target value in the target sheet of the sheet view. Fill in the fields of the step and click Add value.
The value is added to the target data of this mapping, and picked for the row you came from. If the value already exists, the Mapping Tool tells you to pick it from the dropdown instead. A value you added can be removed again in the target sheet of the sheet view. Rows that used it become unmapped.
An added target value exists only in the mapping, not in the target system. Make sure it exists on the target before you run the migration.
Move rows
Drag a row by its handle to move it. Clear the sort first: rows can't be moved while the table is sorted. The order is saved right away and is the order of the rows in the exported Mapping Sheet.
Extra columns
Click Edit columns in the details panel or the sheet view to add your own setting columns to the sheet of this step, for example Retention. You fill them in per row, and they're written to the Mapping Sheet after the template columns. Click Save to keep them.
Sheet view
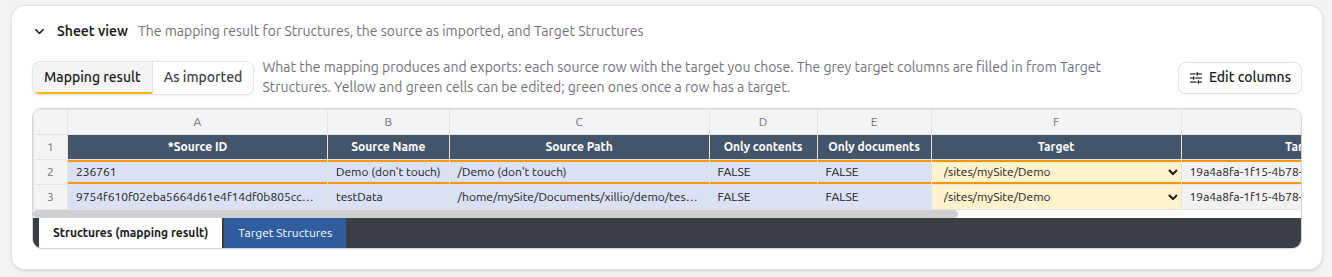
Click Sheet view below the table to see the step as a spreadsheet. It has two tabs:
- Mapping result: what the step exports. Each source row with the target you chose, and the grey target columns filled in from your choice. You can edit the yellow and green cells. The green ones only once a row has a target. Switch to As imported to see only the source columns, as they came from the sheet or MongoDB.
- The target sheet, for example
Target Structures: the target data of the step, which the dropdowns read from.
Structures
Choose where each source folder lands on the target. A folder keeps its path below the target path you choose.
| Setting | Description |
|---|---|
| Only contents | Migrate the contents of the folder, not the folder itself. |
| Only documents | Migrate the documents in the folder, not its subfolders. |
The structure mapping flow processes the rows from top to bottom. If a parent folder comes after its child, the mapping of the parent overwrites that of the child. Keep parent folders above their children. Move rows to fix the order. See Structure Mapping.
The structure mapping flow stores the extra columns of Structures on every item a row maps, under migration.mapping.<column name in lowercase>. They aren't in the source data, so to map one to a target field, add a metadata row with that path on the Metadata step.
| Add row | Add target value |
|---|---|
| Source ID, Folder name and Source path, all required. | Path, Name and ID, required, and Type: Library, Folder or Site. |
Content Types
Choose the target content type for every source content type. The Comments setting is an optional note.
Metadata fields are mapped in the next step, filtered by the target content type you choose here. A source content type set to No op has no fields to migrate.
| Add row | Add target value |
|---|---|
Kind (RECORD or CONTAINER) and System name, required, and Display name. | SystemName, required, and DisplayName. |
Metadata
Map each source field to a target field. The page heading is Map Metadata Fields. The step opens with the Unmapped filter on.
- Tabs per content type. Use All content types, or the tab of one source content type to see only its fields. A tab shows the target content type and its target fields. Fields already mapped are marked.
- Only fitting targets. The dropdown of a field only offers the fields of the target content type you chose on the Content Types step. If that content type isn't mapped yet, the dropdown shows Map the content type first. Click Open Content Types in the notice to go back.
- Groups. Fields are grouped by property path, for example all fields under
source.properties.cmis. Click a group to fold it. The group header shows how many fields are still open, and has a button to set all open fields of the group to No op. Filter has Expand groups and Collapse groups.
| Setting | Description |
|---|---|
| Rule | Copy the value (default): the value of the source field is copied. Fixed value: the Parameter is written as-is, and no source field is needed. Value list (lookup sheet): the value is looked up in the sheet named in Parameter. |
| Parameter | The fixed value, or the name of the lookup sheet. Required when a rule is set. |
| Max length | The maximum length of the value. Text fields only. |
| Format | Optional. The format of the value. |
| Comments | Optional note. |
For what the rules do in the transformation, see the Rules table under the Metadata Fields tab in the Sheet Reference section on the Mapping Sheet Overview.
| Add row | Add target value |
|---|---|
Source content store path and Content types, required, and Display name. One row is added per content type you select. An extra column of Structures is stored on every item as migration.mapping.<column name>. | SystemName and Content types, required, DisplayName, Type and ContentStorePath. The field is added to every target content type you select. |
Principals
Map source users and groups to the people and groups that exist on the target. Several source principals can map to the same target principal.
| Add row | Add target value |
|---|---|
| System name, required, and Display name. | SystemName, required, and DisplayName. |
Permissions
Map each source permission to a permission level on the target. Which permission levels are offered depends on the target system.
| Setting | Description |
|---|---|
| Priority | When several permissions apply to an item, the one with the lowest number wins. |
| Add row | Add target value |
|---|---|
| Source permission, required. | Name, required. |