Create a mapping
A new mapping starts from the source data and the target data of the migration. The Mapping Tool reads them from one of two places:
| Data source | Use it when |
|---|---|
| MongoDB | The source and the target are extracted to MongoDB. This is the usual way. |
| Excel sheet | You have the data in a workbook, for example a Mapping Sheet you exported from the Mapping Tool earlier. |
Before you start
- The source and the target are extracted to MongoDB with their connectors, each in its own database. The target extraction includes the target's
CONTENTTYPEandPRINCIPALobjects. For SharePoint Online, it also includes thepermissionLevelrecords. - The MongoDB connection strings of both databases are secrets in an environment of the project. See Environments, variables, and secrets.
1. Choose the storage location
On the start screen, under Storage location:
- Select the Environment that holds your connection strings.
- In Source database, choose the secret of the source database.
The mapping is stored in this source database. Under Continue a mapping, the start screen lists every mapping already stored there.
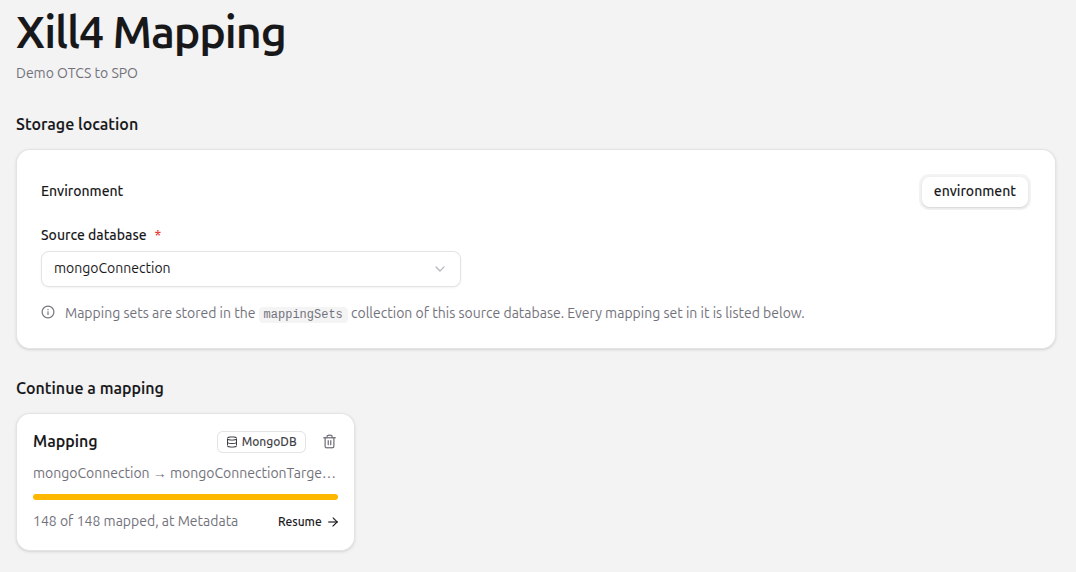
2. Start a new mapping
Under Start a new mapping:
- Enter a Name. The default is
Mapping 1,Mapping 2and so on. - Under Where does the data come from?, choose MongoDB or Excel sheet.
- Fill in the options for that data source, as described below.
- Click Create mapping.
From MongoDB
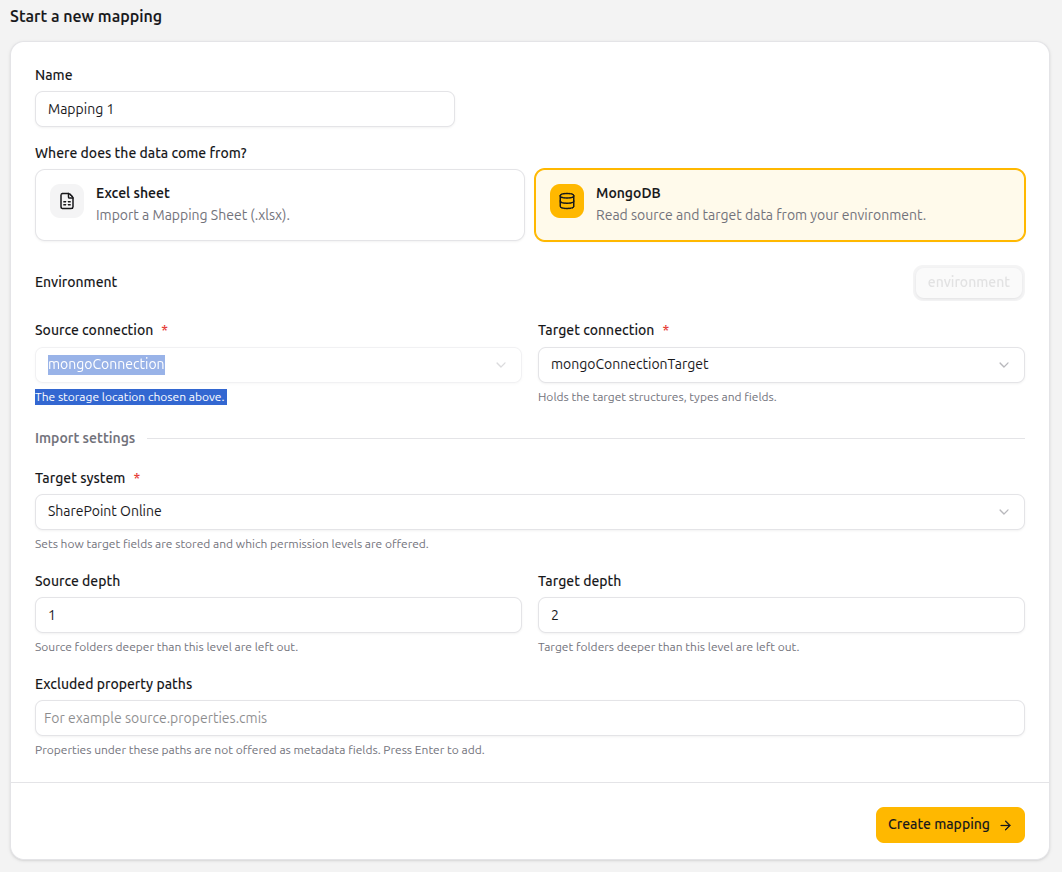
| Option | Description |
|---|---|
| Source connection | The source database you chose as the storage location. You can't change it here. |
| Target connection | The secret of the target database. It holds the target structures, content types, fields and principals. |
| Target system | The target system. It decides which permission levels are offered and how target fields are stored. See Target system. |
| Source depth | How many folder levels of the source are offered on the Structures step. Default: 8. See Depth. |
| Target depth | How many folder levels of the target are offered as targets on the Structures step. Default: 8. |
| Excluded property paths | Optional. Properties under these paths aren't offered on the Metadata step. Use the full path, for example source.properties.cmis. Press Enter or type a comma to add a path. |
If the source and the target use the same connection, the Mapping Tool warns you. Check that this is what you want.
When you click Create mapping, the Mapping Tool reads the data in four steps: Connect to source, Read source data, Connect to target and Read target data. When it's done, the mapping opens at the Structures step.
If reading fails, the mapping is listed with the error under Continue a mapping. Delete it, fix the cause, and create a new one.
Target system
The target system decides two things:
- Permission levels. For SharePoint Online, the permission levels are read from the target database. For the other systems, the Mapping Tool offers a fixed list. For Documentum, the list is empty: add the permission levels yourself with + Add a target value….
- Where target fields are stored. This decides the target content store path of each field, for example
target.properties.<systemName>for SharePoint Online.
The values are the same as those of the Populate Mapping Sheet flow. See targetSystem for the full lists.
Depth
Depth is counted from the root folders of the extraction, the folders without a parent. Depth 1 offers only the root folders, depth 2 adds the folders directly below them, and so on. Values from 1 to 50 are accepted.
From an Excel sheet
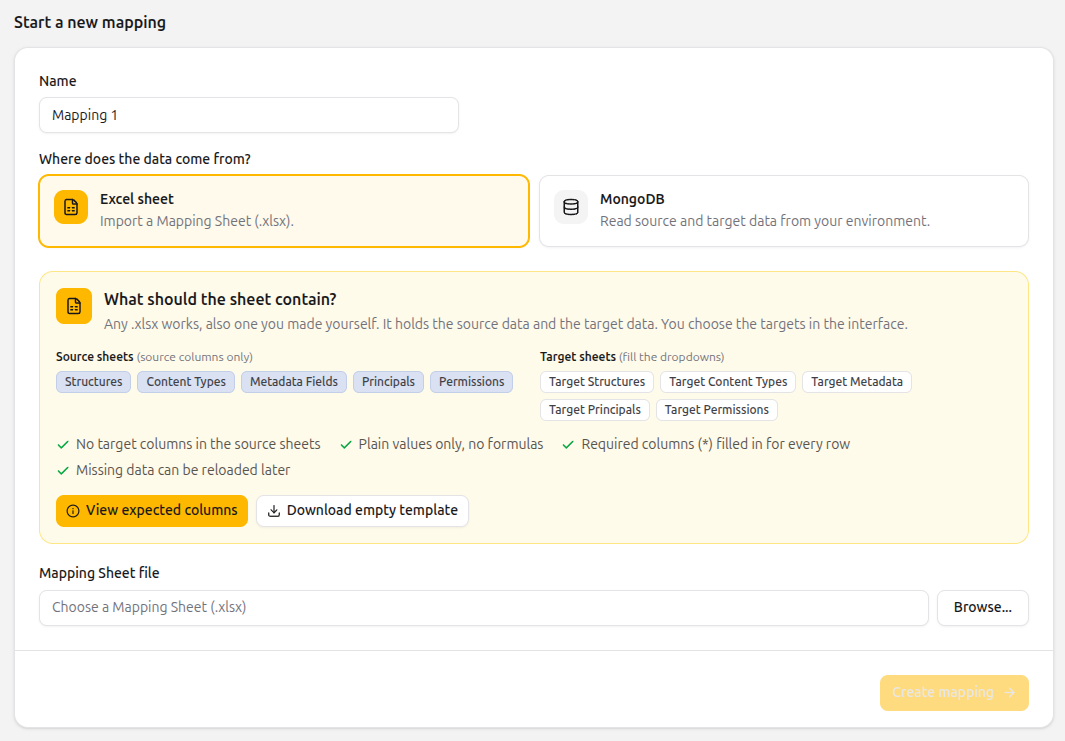
Choose the workbook under Mapping Sheet file and click Create mapping. The sheet is checked and imported in one go.
The workbook holds the source data and the target data, nothing else. You choose the targets in the Mapping Tool afterwards. Click View expected columns for the full format.
| Source sheet | Required columns | Other columns |
|---|---|---|
Structures | Source ID | Source Name, Source Path, Only contents, Only documents |
Content Types | Kind, Source SystemName | Source DisplayName |
Metadata Fields | Kind(s), Source Content Types SystemName | Source Content Types DisplayName, Source DisplayName, Source Content Store Path |
Principals | Source SystemName | Source DisplayName |
Permissions | Source |
| Target sheet | Required columns | Other columns |
|---|---|---|
Target Structures | ID | Name, Path, Type |
Target Content Types | SystemName | DisplayName |
Target Metadata | SystemName, ContentType | DisplayName, ContentStorePath, Type |
Target Principals | SystemName | DisplayName |
Target Permissions | Name |
The rules for the workbook:
- Source columns only on the source sheets. Leave out the Target, calculated and setting columns. The targets come from the target sheets.
- Plain values only. A cell with a formula stops the import.
- Required columns present, and filled in for every row. A missing required column stops the import. A row without a value in a required column is skipped.
- Missing sheets are allowed. Without a source sheet, its step starts empty and you can add rows by hand. Without a target sheet, its step has no targets to choose from until you reload the data.
- Matching content types. A
Metadata Fieldsrow is linked to theContent Typesrow with the same system name. InTarget Metadata,ContentTypelinks each field to its target content type.
A Mapping Sheet that you exported from the Mapping Tool also has Target, calculated and setting columns. Those are read too, so your earlier choices come back. Use this to move a mapping to another source database, or to continue a mapping that someone edited in Excel.
Continue or delete a mapping
Under Continue a mapping, every mapping in the source database is shown as a card. Each card shows where the data came from (MongoDB or Mapping Sheet), how many rows are mapped, and the step you were last on.
- To continue, click the card or Resume. The mapping opens at the step you were last on.
- To delete, click the trash icon on the card and confirm with Delete mapping.