Best Practices
A list of best practices using Xill4.
Structure mapping and defining migration roots
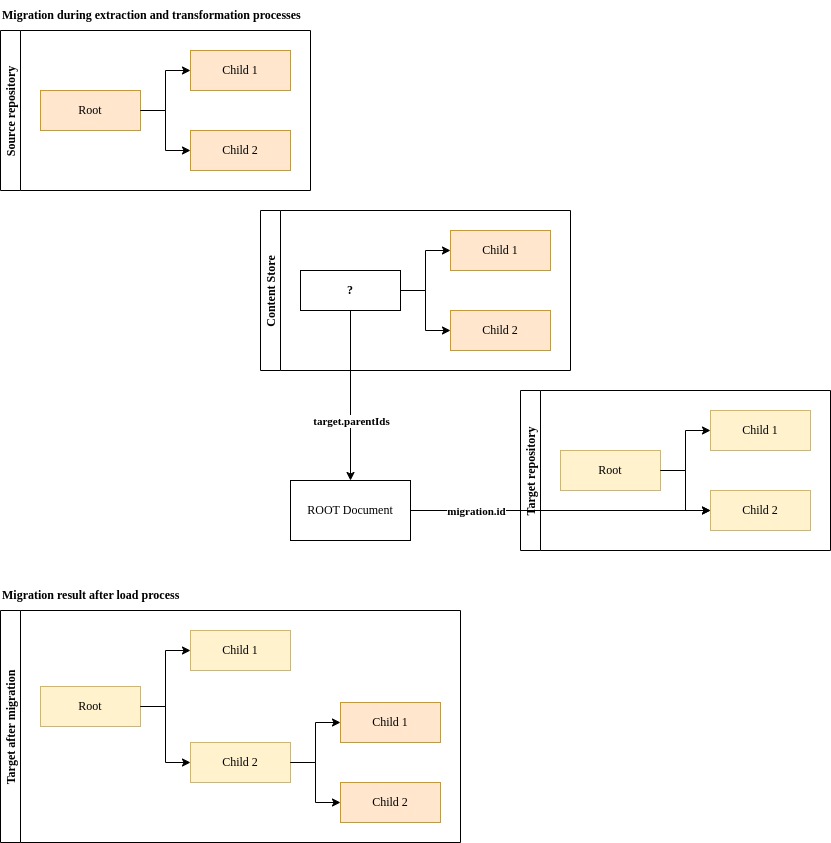
Each migration needs a starting point or starting points in the target repository. These are so-called target roots, they define where content will land. As part of the transformation process these root documents need to be created in the Content Store.
Root documents have there own schema in the Content Store. The schema is called ROOT and is defined in the Content Store data model.
The ROOT schema is very simple. The most important field in it is the migration.id. This field is used to store the ID of the target repository container object. These IDs can be acquired through the target repository either using the UI or an API.
Any content that needs to be directly under these ROOT documents, needs to have their parentIds updated to point to the ROOT document's target.id.
In the example below child 1 and child 2 are migrated into child 2 of the target repository.
Recursive flows
Two topics will be discussed here: making the recursive flow performant and processing or outputting data in order.
Performance
When building recursive flows, e.g. when using the Document Retrieve component utilizing the parent/child relationships of an object, it is recommended to measure the performance of the flow. In certain cases the components might insert too many objects in the flow, causing the application to run out of memory. Take for example this flow:

In this flow, after the Code component, the object is sent back to the Document Retrieve component to retrieve the children of the component. When adding two Counter components, one after the Document Retrieve component and another after Document Store component, we notice that the Document Store component has a hard time keeping up.

After some time this will cause the application to run out of memory. We can give the Document Store component more time by adding a Delay component after the Code component before sending the object back to the Document Retrieve component.
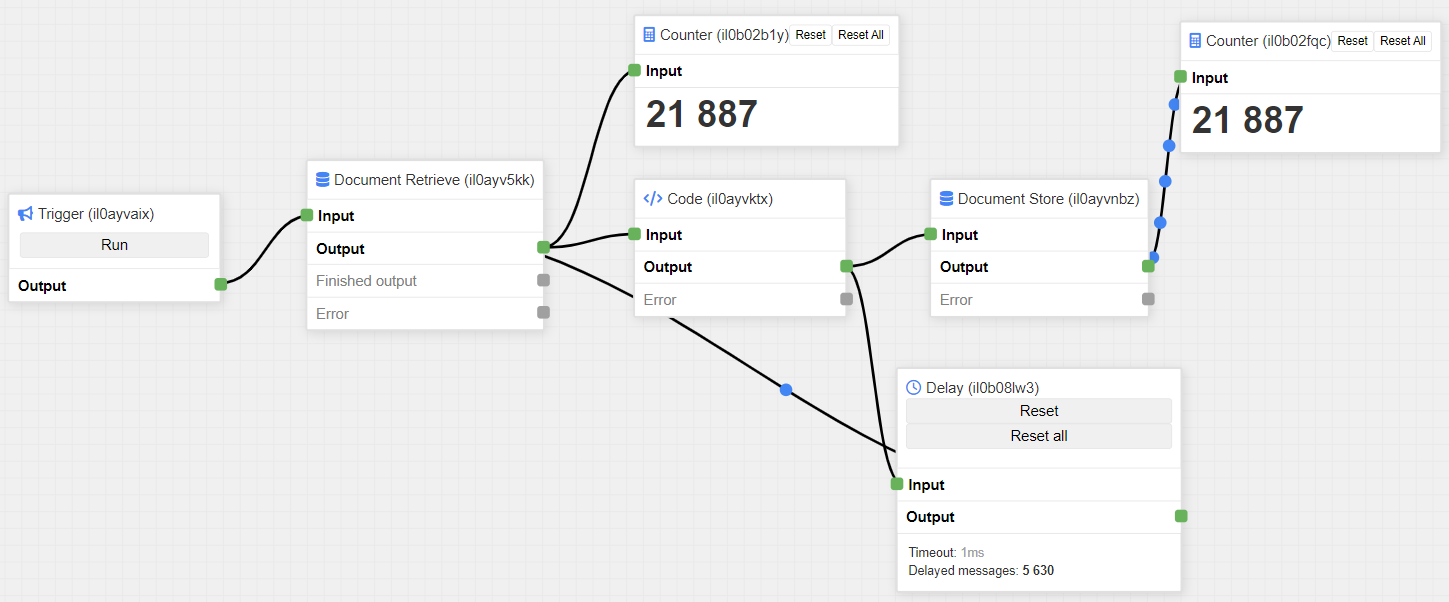
As it can be seen, now the flow is performing much better and the application won't run out of memory.
Processing order
It may be important to process or output the data in a certain order, when reporting, for example. However, Xill4 flows do process data asynchronously. When we log the hierarchy of the objects with this flow:

You get unsorted output like this:
\a
\b
\a\1
\a\2
We can use the stack component to make sure data is processed in order. In the Document Retrieve component, the sort order should also be reversed on the hierarchy field.

Now the output is sorted:
\a
\a\1
\a\2
\b
Using projections
When using any of the Content Store components, it is possible to use projections to limit the amount of data that is retrieved from the Content Store. This can be useful when you only need a subset of the data in the database and improves the memory usage of the flow.
For more information on projections, see the MongoDB documentation: Projections
Monitoring memory usage
When running flows, it is important to monitor the memory usage of the flow. This can be done by looking at the number of pending messages in the flow and the memory usage of the flow. Both of these can be found in the flow status bar at the bottom of a flow. When the number of pending messages is constantly increasing, the flow may run out of memory, depending on the type of messages that are being processed. This means more data is being added to the flow that can't be processed fast enough. Using the I/O stats on a component can help to identify which component is causing the issue. To remove the bottleneck, you can change the rate-limiting settings of the component responsible for adding messages to the flow.
Running a migration in batches
When dealing with a large migration data set, it is often recommended to split it into smaller sets per business unit, which can be defined as a team, department, or any other relevant unit. This approach, known as running migrations in batches, helps to make the migration process more manageable.
To ensure optimal performance and facilitate debugging, it is advisable to establish a separate Content Store for each batch. By doing so, you can isolate the data and operations specific to each batch, leading to improved efficiency and easier identification of any issues that may arise.
The selection criteria for creating these batches should be determined based on your specific use case and requirements. Once you have identified the appropriate selection criteria, we offer an accelerator that can assist you in seamlessly transferring data from one Content Store to another.
Upgrading Xill4
Upgrading Xill4 demands careful planning and consideration to ensure a smooth transition and uninterrupted workflow. Prior to initiating the upgrade process, it's crucial to assess and prepare for potential challenges. Here's a step-by-step guide to assist you in this process:
-
Evaluate the Need for Upgrade: Begin by assessing the necessity and benefits of upgrading your Xill4 installation. Consider factors such as new features, bug fixes, or security enhancements offered by the updated version.
-
Review Release Notes: Thoroughly examine the release notes for the new Xill4 version. Pay particular attention to any critical information regarding breaking changes, known issues, or feature deprecations that might impact your existing setup.
-
Create a Backup Plan: Before proceeding with the upgrade, create comprehensive backups of both your Xill4 installation folder and Content Store. This precaution ensures that in the event of any unexpected issues, you can easily revert to the previous working state.
-
Check Compatibility: Verify whether any third-party integrations, plugins, or custom configurations in your current Xill4 setup will be compatible with the new version. Assessing compatibility helps anticipate and address potential conflicts during the upgrade.
-
Follow Upgrade Instructions: Refer to the Xill4 installation guide for precise instructions on the upgrade process. Adhering strictly to these guidelines reduces the likelihood of errors during the upgrade.
-
Test and Validate: After completing the upgrade, thoroughly test all aspects of your projects and functionalities within Xill4. Ensure that everything is functioning as expected and validate the integrity of your data.
-
Consider Timings: If you have a planned production migration or critical operational phase approaching, consider postponing the Xill4 upgrade until after these events. This avoids potential disruptions to essential processes.